Build a Serverless application using AWS Lambda, AWS API gateway, AWS SQS and deploy using AWS sam
Managing cloud resources might be one of the most time-consuming things that you have to do when building an application. Using managed resources greatly helps you to focus more on development and less on the configuration and maintenance of cloud infrastructure.
Here we are going to build a serverless application using AWS managed resources like
- AWS Lambda functions
- AWS Simple queue service(SQS)
- AWS API gateway
- AWS SAM (for deployment)
Prerequisites
- Nodejs
- We are using Nodejs as our lambda runtime. Any of the available runtimes will work
- Install node 14.x
- Docker
- We are using container images to deploy our Lambda functions
- AWS SAM takes care of all the configurations and deployment, So prior experience with docker is not required.
- Install docker
- AWS-CLI
- AWS-CLI is a tool to manage AWS Resources
- AWS documentation has a very clear guide for installing AWS-CLI
- Configure AWS-CLI
- AWS-SAM
- AWS-SAM or Serverless Application Model works on top of AWS Cloudformation to simplify serverless applications deployments in AWS
- AWS documentation has a very clear guide for installing and configuring AWS-SAM
After installing all the Prerequisites we can get started
Setting up the project
Initialise SAM application
We are going to start with a hello world template with run time as node 14.x and package type as docker image.
$ sam init

You can preselect a particular runtime or package type when using the `sam init` experience.
Call `sam init --help` to learn more.

Which template source would you like to use?
	1 - AWS Quick Start Templates
	2 - Custom Template Location
Choice: 1

Choose an AWS Quick Start application template
	1 - Hello World Example
	2 - Multi-step workflow
	3 - Serverless API
	4 - Scheduled task
	5 - Standalone function
	6 - Data processing
	7 - Infrastructure event management
	8 - Machine Learning
Template: 1

 Use the most popular runtime and package type? (Python and zip) [y/N]: n

Which runtime would you like to use?
	1 - dotnet6
	2 - dotnet5.0
	3 - dotnetcore3.1
	4 - go1.x
	5 - java11
	6 - java8.al2
	7 - java8
	8 - nodejs14.x
	9 - nodejs12.x
	10 - python3.9
	11 - python3.8
	12 - python3.7
	13 - python3.6
	14 - ruby2.7
Runtime: 8

What package type would you like to use?
	1 - Zip
	2 - Image
Package type: 2

Based on your selections, the only dependency manager available is npm.
We will proceed copying the template using npm.

Project name [sam-app]:

Cloning from https://github.com/aws/aws-sam-cli-app-templates (process may take a moment)

    -----------------------
    Generating application:
    -----------------------
    Name: sam-app
    Base Image: amazon/nodejs14.x-base
    Architectures: x86_64
    Dependency Manager: npm
    Output Directory: .
    Next steps can be found in the README file at ./sam-app/README.md


    Commands you can use next
    =========================
    [*] Create pipeline: cd sam-app && sam pipeline init --bootstrap
    [*] Test Function in the Cloud: sam sync --stack-name {stack-name} --watch
AWS SAM has now created a hello world project called sam-app with boilerplate configurations.
The sam-app directory should look something like this:
sam-app
├── .gitignore
├── README.md
├── events
│   └── event.json
├── hello-world
│   ├── .npmignore
│   ├── Dockerfile
│   ├── app.js
│   ├── package.json
│   └── tests
│       └── unit
│           └── test-handler.js
└── template.yaml
Let's just see what some of these are
- events → event.json
- Lambda functions receive an event object when invoked. The event.json file contains a sample api gateway event that we can use for testing
- hello-world
- The hello-world directory is the lambda directory
- app.js is the entry point to the lambda
- Dockerfile containing the commands to build the lambda container image
- tests can be used to write test cases for your lambda. By default, the template comes with chai and mocha and test-handler.js has a template test case written.
- template.yaml
- This file describes the resources required and how to build them in AWS
Building the app
We are trying to build a serverless application with 2 lambda functions. Lambda-1 gets invoked by API gateway and lambda-2 gets invoked by SQS. So let's go ahead and duplicate hello-world and rename the duplicate to lambda-2. Let’s rename hello-world to lambda-1.
Our architecture will look something like this.

Our directory will look something like this now
sam-app
├── .gitignore
├── README.md
├── events
│   └── event.json
├── lambda-1
│   ├── .npmignore
│   ├── Dockerfile
│   ├── app.js
│   ├── package.json
│   └── tests
│       └── unit
│           └── test-handler.js
├── lambda-2
│   ├── .npmignore
│   ├── Dockerfile
│   ├── app.js
│   ├── package.json
│   └── tests
│       └── unit
│           └── test-handler.js
└── template.yaml
Now that our project folder is set up, let's make some code changes in our lambda functions
Lambda-1
We need to configure lambda-1 to be invoked by API gateway. Let’s consider a case where the lambda is hit by a request, we need to take the request body, validate it and add it to SQS and return a success message.
app.js is the entry point to the lambda function. A handler function must be present in this entry point and lambda will invoke this function during execution. Since we used a template, there will be some boilerplate code in app.js.
Let's clear that up and make some changes
let response;
exports.lambdaHandler = async (event, context) => {
    try {
        const payload = event.body;
				/*
					write ur logic here
					.
					.
					.
        */
				// send data to sqs
        response = {
            'statusCode': 200,
            'body': JSON.stringify({
                message: 'Sucessfully added data to sqs',
                // location: ret.data.trim()
            })
        }
    } catch (err) {
        console.log(err);
        return err;
    }
    return response
};
Now let’s create a util for sending messages to SQS.
In order to access SQS from your lambda we need aws-sdk npm package.
Let’s install aws-sdk npm package in lambda-1 directory and create the SQS util
#/sam-app/lambda-1
npm install aws-sdk
mkdir utils && touch utils/sqs.js
After installing aws-sdk, Let’s create the utils directory and sqs.js util file.
utils/sqs.js
//SQS util
const AWS = require('aws-sdk');
const sqs = new AWS.SQS({// We can store these credentials in lambda environment variables
    accessKeyId: process.env.ACCESS_KEY,
    secretAccessKey: process.env.SECRET_KEY,
    apiVersion: process.env.AWS_SQS_API_VERSION,
    region: process.env.REGION
});

module.exports.constructDataForSqs = (body, options = {}) => {

    if (!options.queueUrl) {
        throw new Error('QueueUrl not given');
    }
    if (!body) {
        throw new Error('body not given');
    }

    let MessageAttributes = {};
    if (options.messageAttributes) {
        for (const key of Object.keys(options.messageAttributes)) {
            MessageAttributes[key] = {
                DataType: options.messageAttributes[key].dataType,
                StringValue: options.messageAttributes[key].stringValue
            }
        }
    }
    const params = {
        MessageAttributes,
        MessageBody: JSON.stringify(body),
        QueueUrl: options.queueUrl
    };
    return params;
}

module.exports.sendMessage = async (params) => {
    try {
        const data = await sqs.sendMessage(params).promise();
        console.log("Success", data.MessageId);
        return { success: true, response: data }
    } catch (err) {
        console.log('Error in sqs-util sendMessage', err);
        throw err;
    }
}
Now let’s use this util to send message to SQS. We are going to import this util into app.js and then send the payload got from api-gateway to SQS.
app.js
const sqsUtil = require('./utils/sqs');
let response;
exports.lambdaHandler = async (event, context) => {
    try {
        let payload = event.body;
        /*
            write ur logic here
            .
            .
            .
        */
        const options = {
            queueUrl: process.env.SQS_URL, // required
            messageAttributes: { // optional
                source: {
                    dataType: 'string',
                    stringValue: 'lambda-1'
                }
            }
        };
        const params = sqsUtil.constructDataForSqs(payload, options)
        const sqsResponse = await sqsUtil.sendMessage(params);
        response = {
            'statusCode': 200,
            'body': JSON.stringify({
                message: 'Sucessfully added data to sqs',
                response: sqsResponse.response
                // location: ret.data.trim()
            })
        }
    } catch (err) {
        console.log(err);
        return err;
    }
    return response
};
So now lambda-1 gets invoked by a request from API Gateway, takes the payload, processes it(if any logic) and then sends the data to SQS.
Now let’s make some changes to the Dockerfile to build this Lambda
The default Dockerfile should look like this
FROM public.ecr.aws/lambda/nodejs:14

COPY app.js package*.json ./

RUN npm install
# If you are building your code for production, instead include a package-lock.json file on this directory and use:
# RUN npm ci --production

# Command can be overwritten by providing a different command in the template directly.
CMD ["app.lambdaHandler"]
Here the app.js and package*.json files are copied into the image. In our case, we added a utils directory. We need that directory copied inside the image for our lambda to work. So let’s make a few changes.
FROM public.ecr.aws/lambda/nodejs:14

COPY package*.json ./

RUN npm install

COPY . .

CMD ["app.lambdaHandler"]
Here we install the npm packages first for efficiency. When we rebuild the image we will re-install packages only if anything in package*.json files change.
We then copy everything in the directory to our image. If you remember the entry point to our lambda function is app.lambdahandler(). So we add that in the CMD instruction. The main purpose of a CMD is to provide defaults for executing a container.
Thus we have set up lambda-1.
Lambda-2
Lambda-2 is invoked by SQS. It receives an array of Records from SQS, which contains the message body and message attributes that we sent from lambda-1 or any other source.
Let’s modify app.js in lambda-2 to accept records from SQS.
For the sake of keeping it simple, let’s just log the message app.js
exports.lambdaHandler = async (event, context) => {
    try {
        if (!(event?.Records?.length)) {
            return 'No records'
        }
        for( const record of event.Records){
            const body = record.body;
			const source = record?.messageAttributes?.source
            console.log(body)
            console.log(source)
            /*
            your logic
            */
        }
        return 'Successfully processed Records'
    } catch (err) {
        console.log(err);
        return err;
    }

};
Dockerfile
Let’s use the contents of our Dockerfile from lambda-1
FROM public.ecr.aws/lambda/nodejs:14

COPY package*.json ./

RUN npm install

COPY . .

CMD ["app.lambdaHandler"]
Now lambda-1 and lambda-2 are ready. Let's prepare for deploying these to 2 environments. Staging and Production.
In order to create our resources in AWS, we need to describe it in template.yaml file
template.yaml
We need the following resources for this project:
- api gateway
- sqs
- lambda-1
- lambda-2
- event-source mappings for lambda-1 to be invoked by API Gateway
- event-source mapping for lambda-2 to be invoked by SQS
We can specify this in the the template.yaml file.
Let’s make some changes in template.yaml and create our resources:
AWSTemplateFormatVersion: '2010-09-09'
Transform: AWS::Serverless-2016-10-31
Description: >
  sam-app

  Sample SAM Template for sam-app

# More info about Globals: https://github.com/awslabs/serverless-application-model/blob/master/docs/globals.rst
Globals:
  Function:
    Timeout: 30 # we can set default timeout of all lambda functions here

Resources:

  Lambda1Api:
    Type: AWS::Serverless::Api
    Properties:
      StageName: api

  Lambda2Sqs:
    Type: AWS::SQS::Queue
    Properties:
      VisibilityTimeout: 65 # should be greater that lambda timeout

  Lambda1:
    Type: AWS::Serverless::Function
    Properties:
      PackageType: Image
      Architectures:
        - x86_64
      MemorySize: 128
      Environment:
        Variables:
          SQS_URL: !Ref Lambda2Sqs  # Gets SQS Queue URL
      Events:
        Lambda1ApiProxy:
          Type: Api
          Properties:
            Path: /{proxy+}
            Method: ANY
            RestApiId:
              Ref: Lambda1Api
    Metadata:
      DockerTag: nodejs14.x-v1
      DockerContext: ./lambda-1
      Dockerfile: Dockerfile

  Lambda2:
    Type: AWS::Serverless::Function
    Properties:
      PackageType: Image
      Architectures:
        - x86_64
      MemorySize: 128
      Timeout: 60 #manually overriding function timeout
      Events:
        lambda2invoker:
          Type: SQS
          Properties:
            Queue: !GetAtt Lambda2Sqs.Arn
            BatchSize: 1
    Metadata:
      DockerTag: nodejs14.x-v1
      DockerContext: ./lambda-2
      Dockerfile: Dockerfile
Now that we have setup our template, the serverless application is ready to be deployed
Deployment
For deploying we are using AWS-SAM. Before we go any further make sure AWS-CLI and AWS-SAM are configured.
We need to deploy our app to staging and production.
Staging
sam build
After build is successful you will see something like this
Build Succeeded

Built Artifacts  : .aws-sam/build
Built Template   : .aws-sam/build/template.yaml

Commands you can use next
=========================
[*] Invoke Function: sam local invoke
[*] Test Function in the Cloud: sam sync --stack-name {stack-name} --watch
[*] Deploy: sam deploy --guided
We have successfully built our app.
Now it’s time for deploying to AWS.
AWS-SAM or Serverless Application Model, uses a samconfig.toml file to deploy our resources to AWS.
We can generate samconfig.toml and deploy our changes using sam deploy --guided command
sam deploy --guided
When doing a guided deployment sam asks you to give the deployment configurations.
sam deploy --guided

Configuring SAM deploy
======================

	Looking for config file [samconfig.toml] :  Not found

	Setting default arguments for 'sam deploy'
	=========================================
	Stack Name [sam-app]: **staging** #stack name is the unique identifier for your app
	AWS Region [us-east-2]: **us-west-2**
	#Shows you resources changes to be deployed and require a 'Y' to initiate deploy
	Confirm changes before deploy [y/N]: **y**
	#SAM needs permission to be able to create roles to connect to the resources in your template
	Allow SAM CLI IAM role creation [Y/n]: **y**
	#Preserves the state of previously provisioned resources when an operation fails
	Disable rollback [y/N]: **n**
	Lambda1 may not have authorization defined, Is this okay? [y/N]: **y** #authorization is beyond the scope of this tutorial, but there are many resources that show how to do it
	Save arguments to configuration file [Y/n]: y
  #here we create the samconfig.toml file that aws sam uses to store our deployment configuration
	SAM configuration file [samconfig.toml]:
	SAM configuration environment [default]: **staging**

	Looking for resources needed for deployment:
	Creating the required resources...
.
. # sam descriptions are shown
.
Create managed ECR repositories for all functions? [Y/n]: **y
.
.
.
.**
Previewing CloudFormation changeset before deployment
======================================================
Deploy this changeset? [y/N]: **y
.
.
.**
-----------------------------------------------------------------------------------------------------

Successfully created/updated stack - staging in us-west-2
Now we have deployed our app to staging
After successful deployment, AWS sam creates the samconfig.toml file if does not exist. Let’s take a look at that.
version = 0.1
[staging]
[staging.deploy]
[staging.deploy.parameters]
stack_name = "staging"
s3_bucket = "aws-sam-cli-managed-default-samclisourcebucket-kd0tv9v6wm6s"
s3_prefix = "staging"
region = "us-west-2"
confirm_changeset = true
capabilities = "CAPABILITY_IAM"
image_repositories = ["Lambda1=1234.dkr.ecr.us-west-2.amazonaws.com/staging830f78e0/lambda16ea82c0crepo", "Lambda2=1234.dkr.ecr.us-west-2.amazonaws.com/staging830f78e0/lambda2bc5146a5repo"]
Here staging is the environment name. We can write a lot of configuration in samconfig.toml and you can find the documentation to that here.
Now that we have created our staging configurations, for subsequent deployments we can easily deploy to our staging resources using the following command
sam deploy --config-env staging
This works because we had specified our environment to be staging during guided deployment.
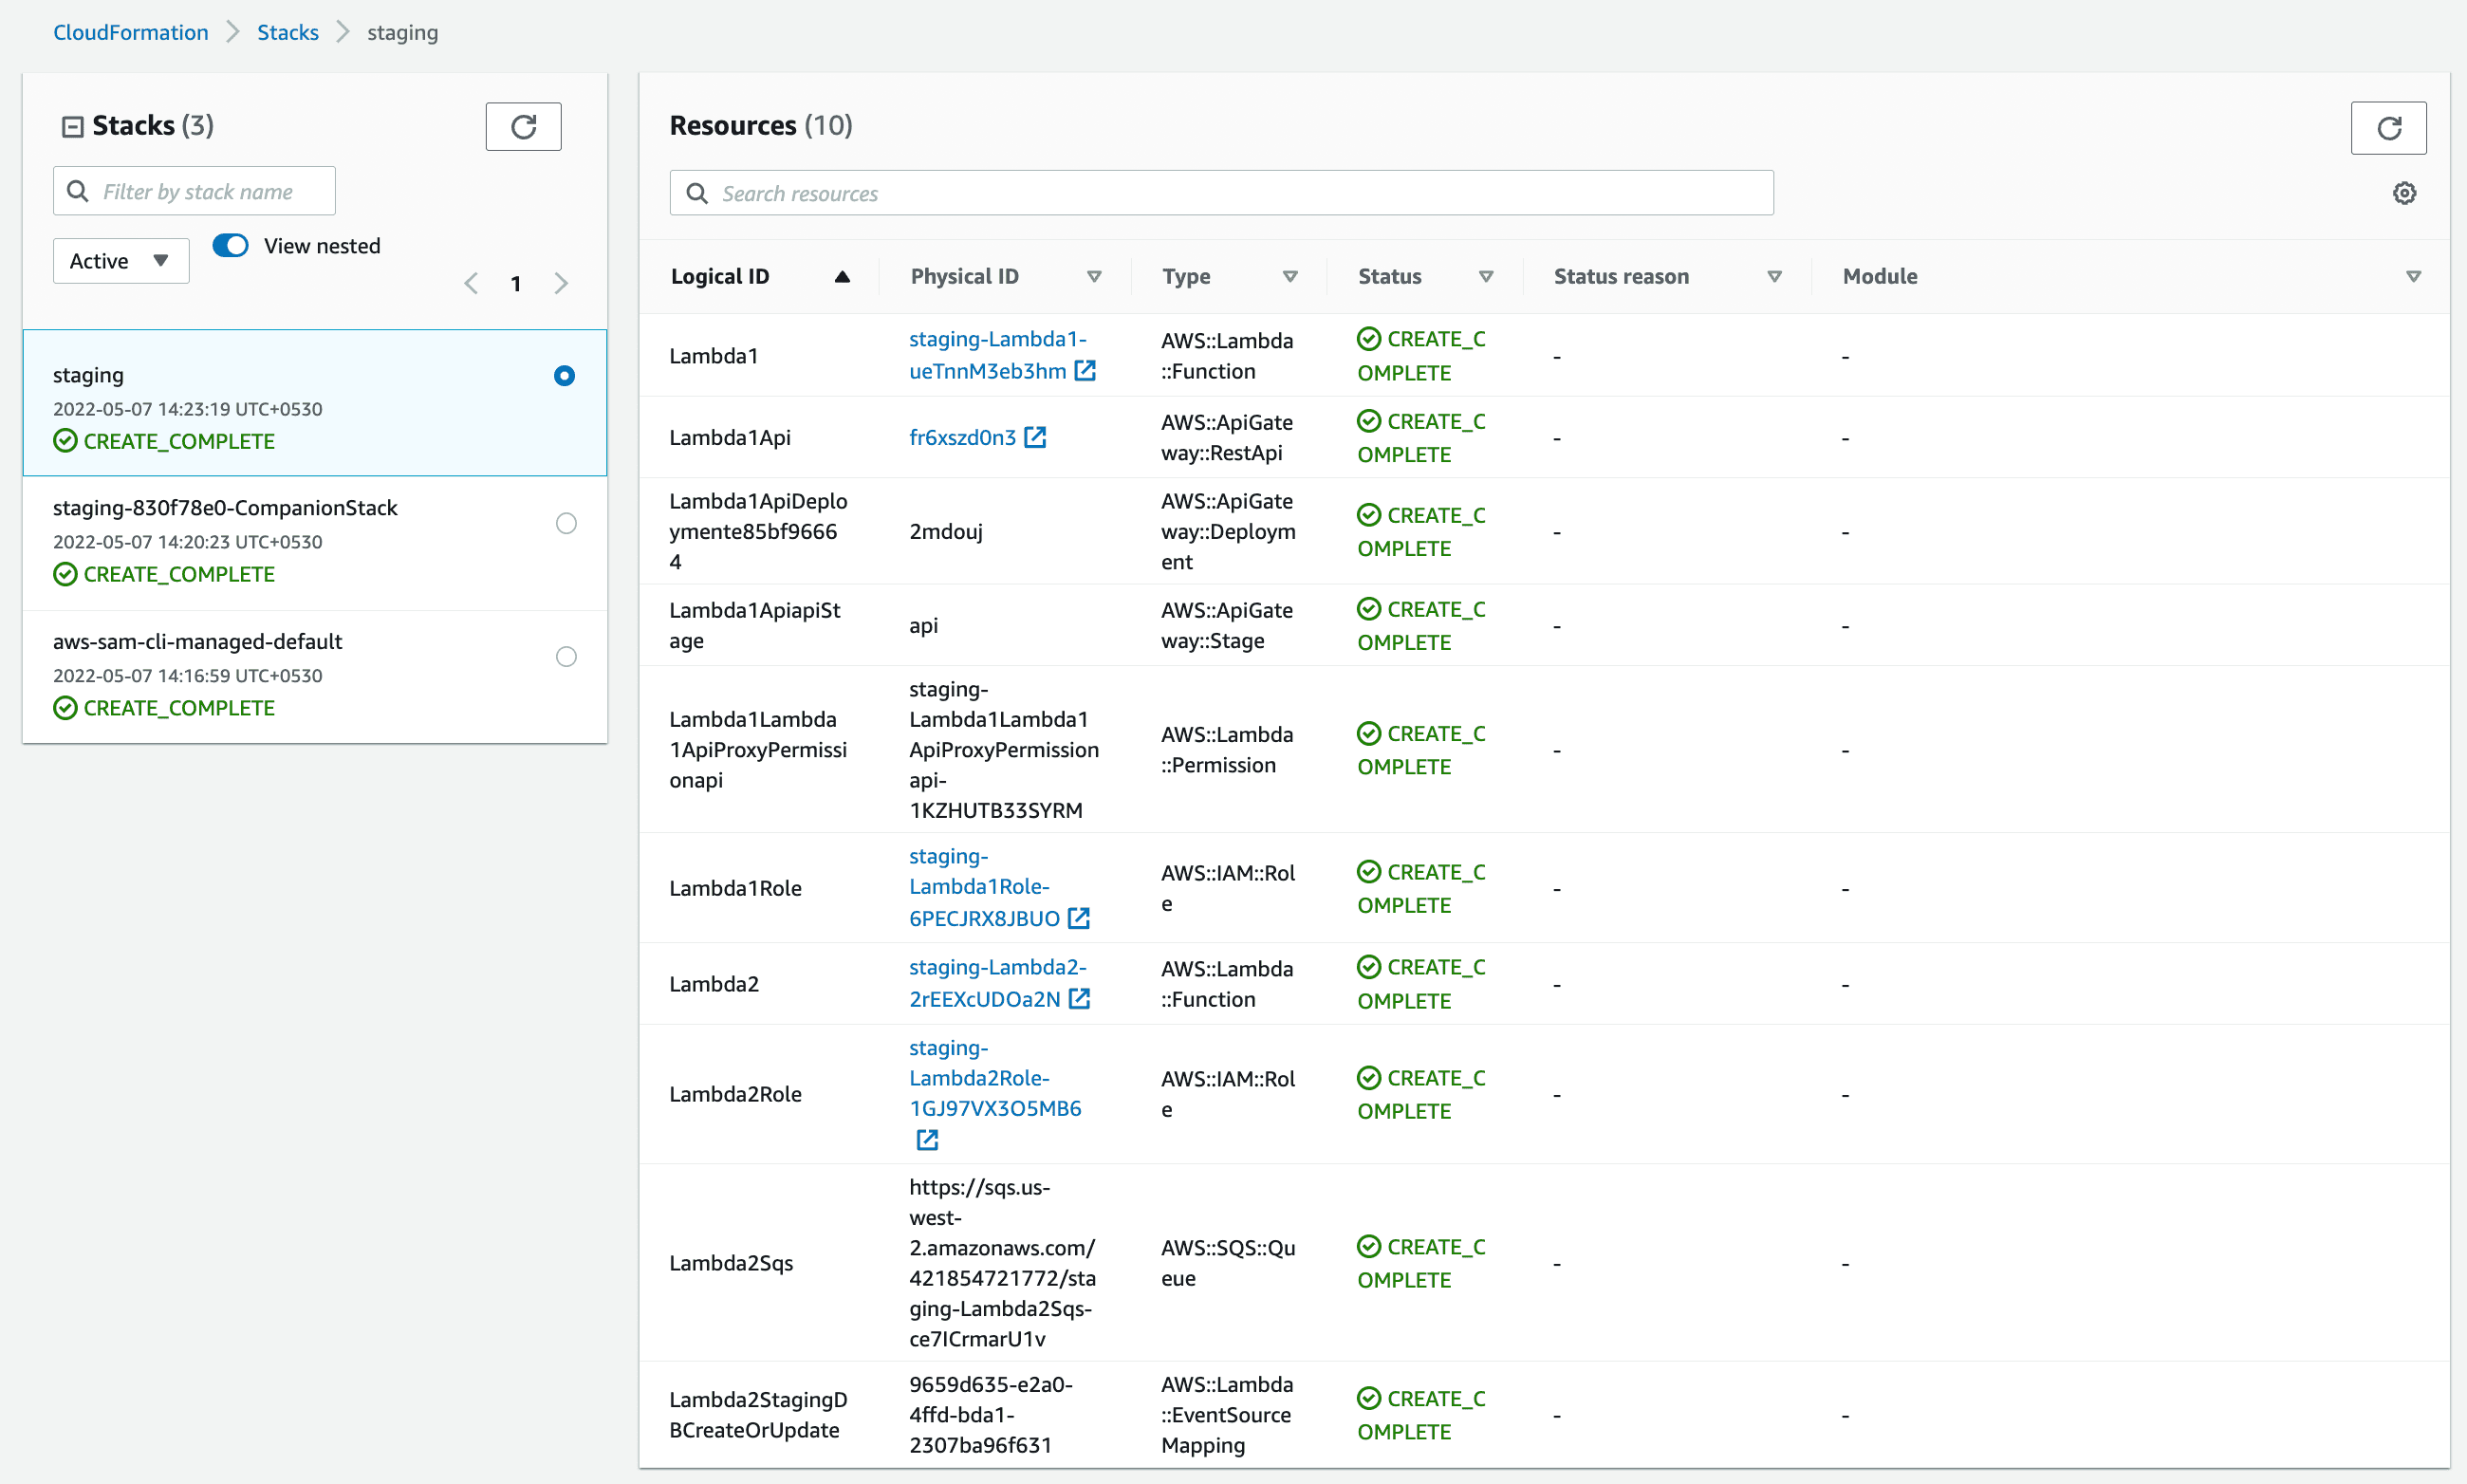
AWS SAM uses AWS Cloudformation to create and manage our resources. After the deployment is successful, if you go to AWS Cloudformation you will be able to see your stack and resources.

Let's go to the Lambda function’s section in AWS

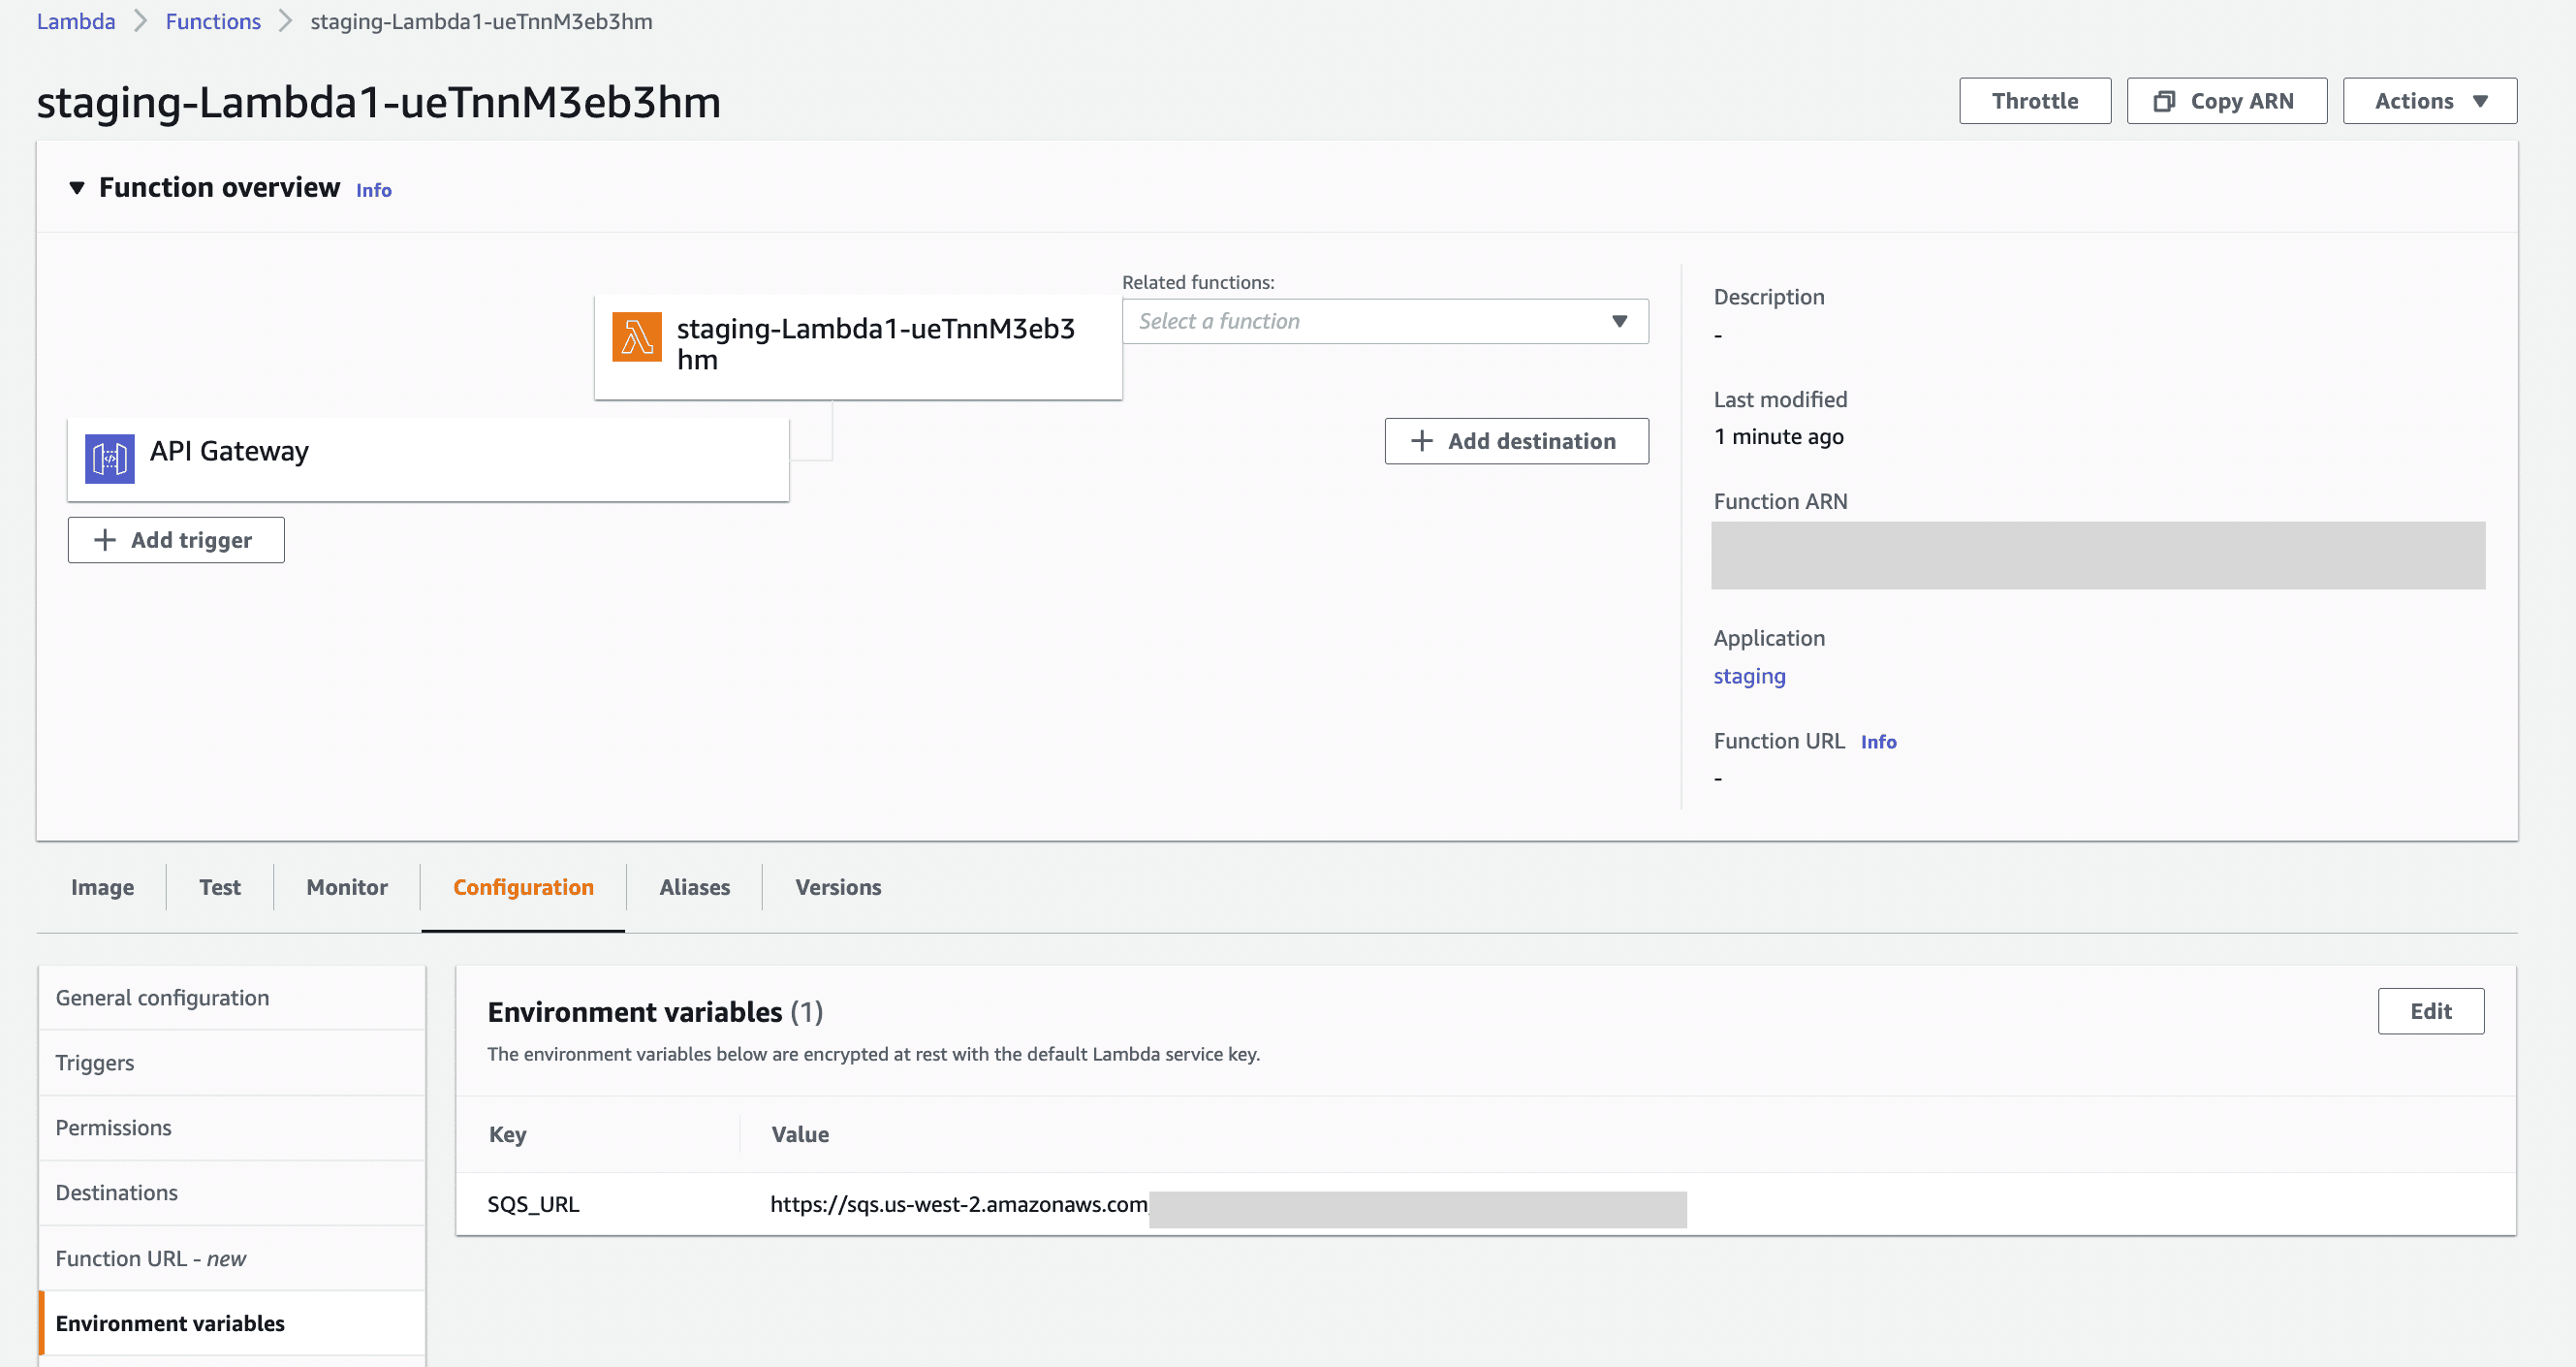
We can see that our staging lambdas are created
If you remember, we need to set some environment variables for Lambda1
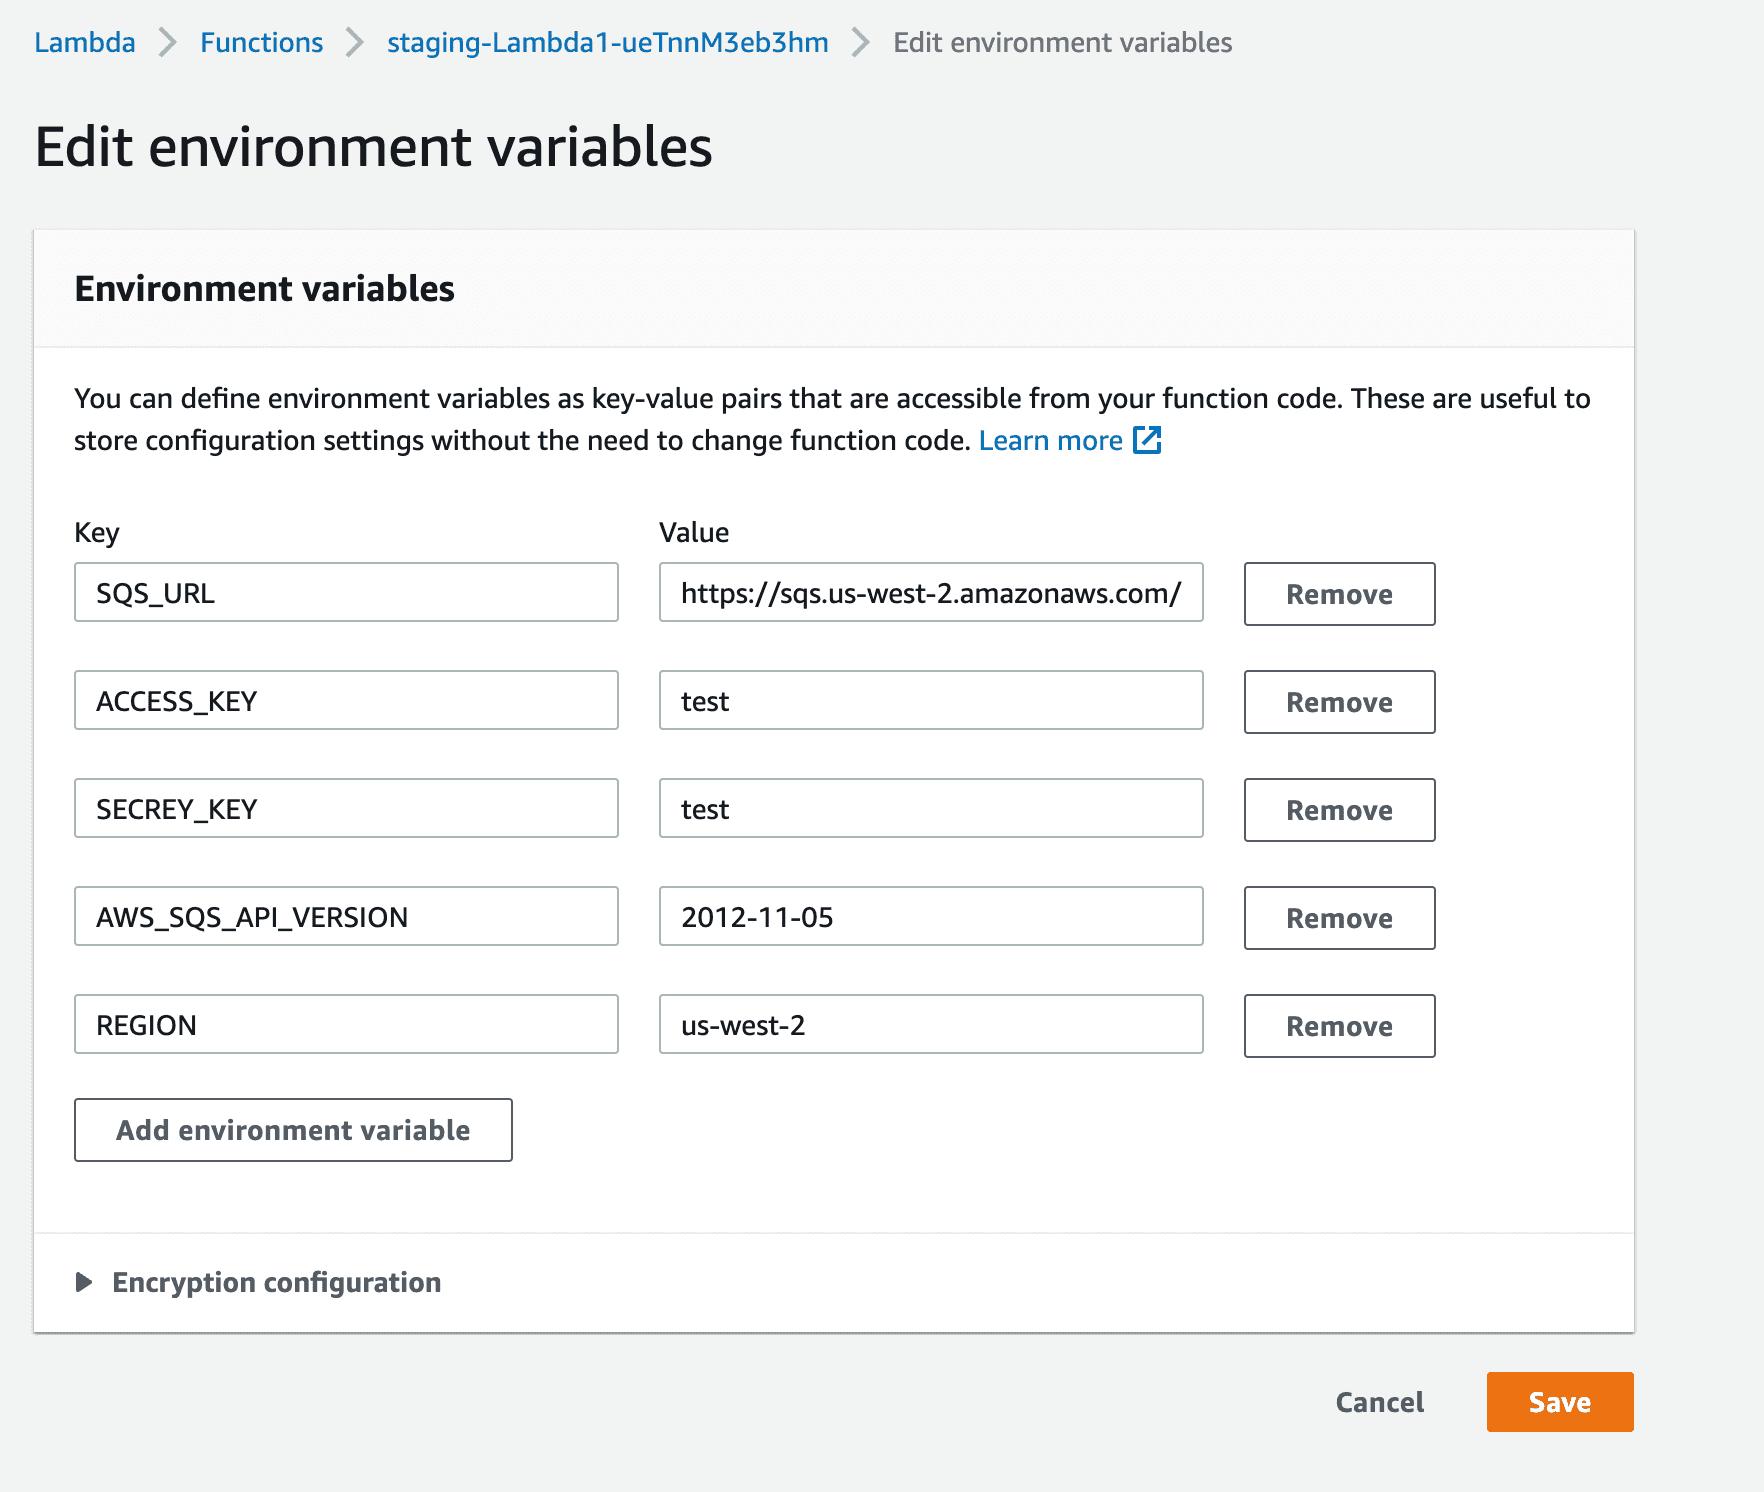
Use your ACCESS_KEY and SECRET_KEY which you created when initialising AWS-CLI or create another set of keys with IAM permissions for accessing SQS.
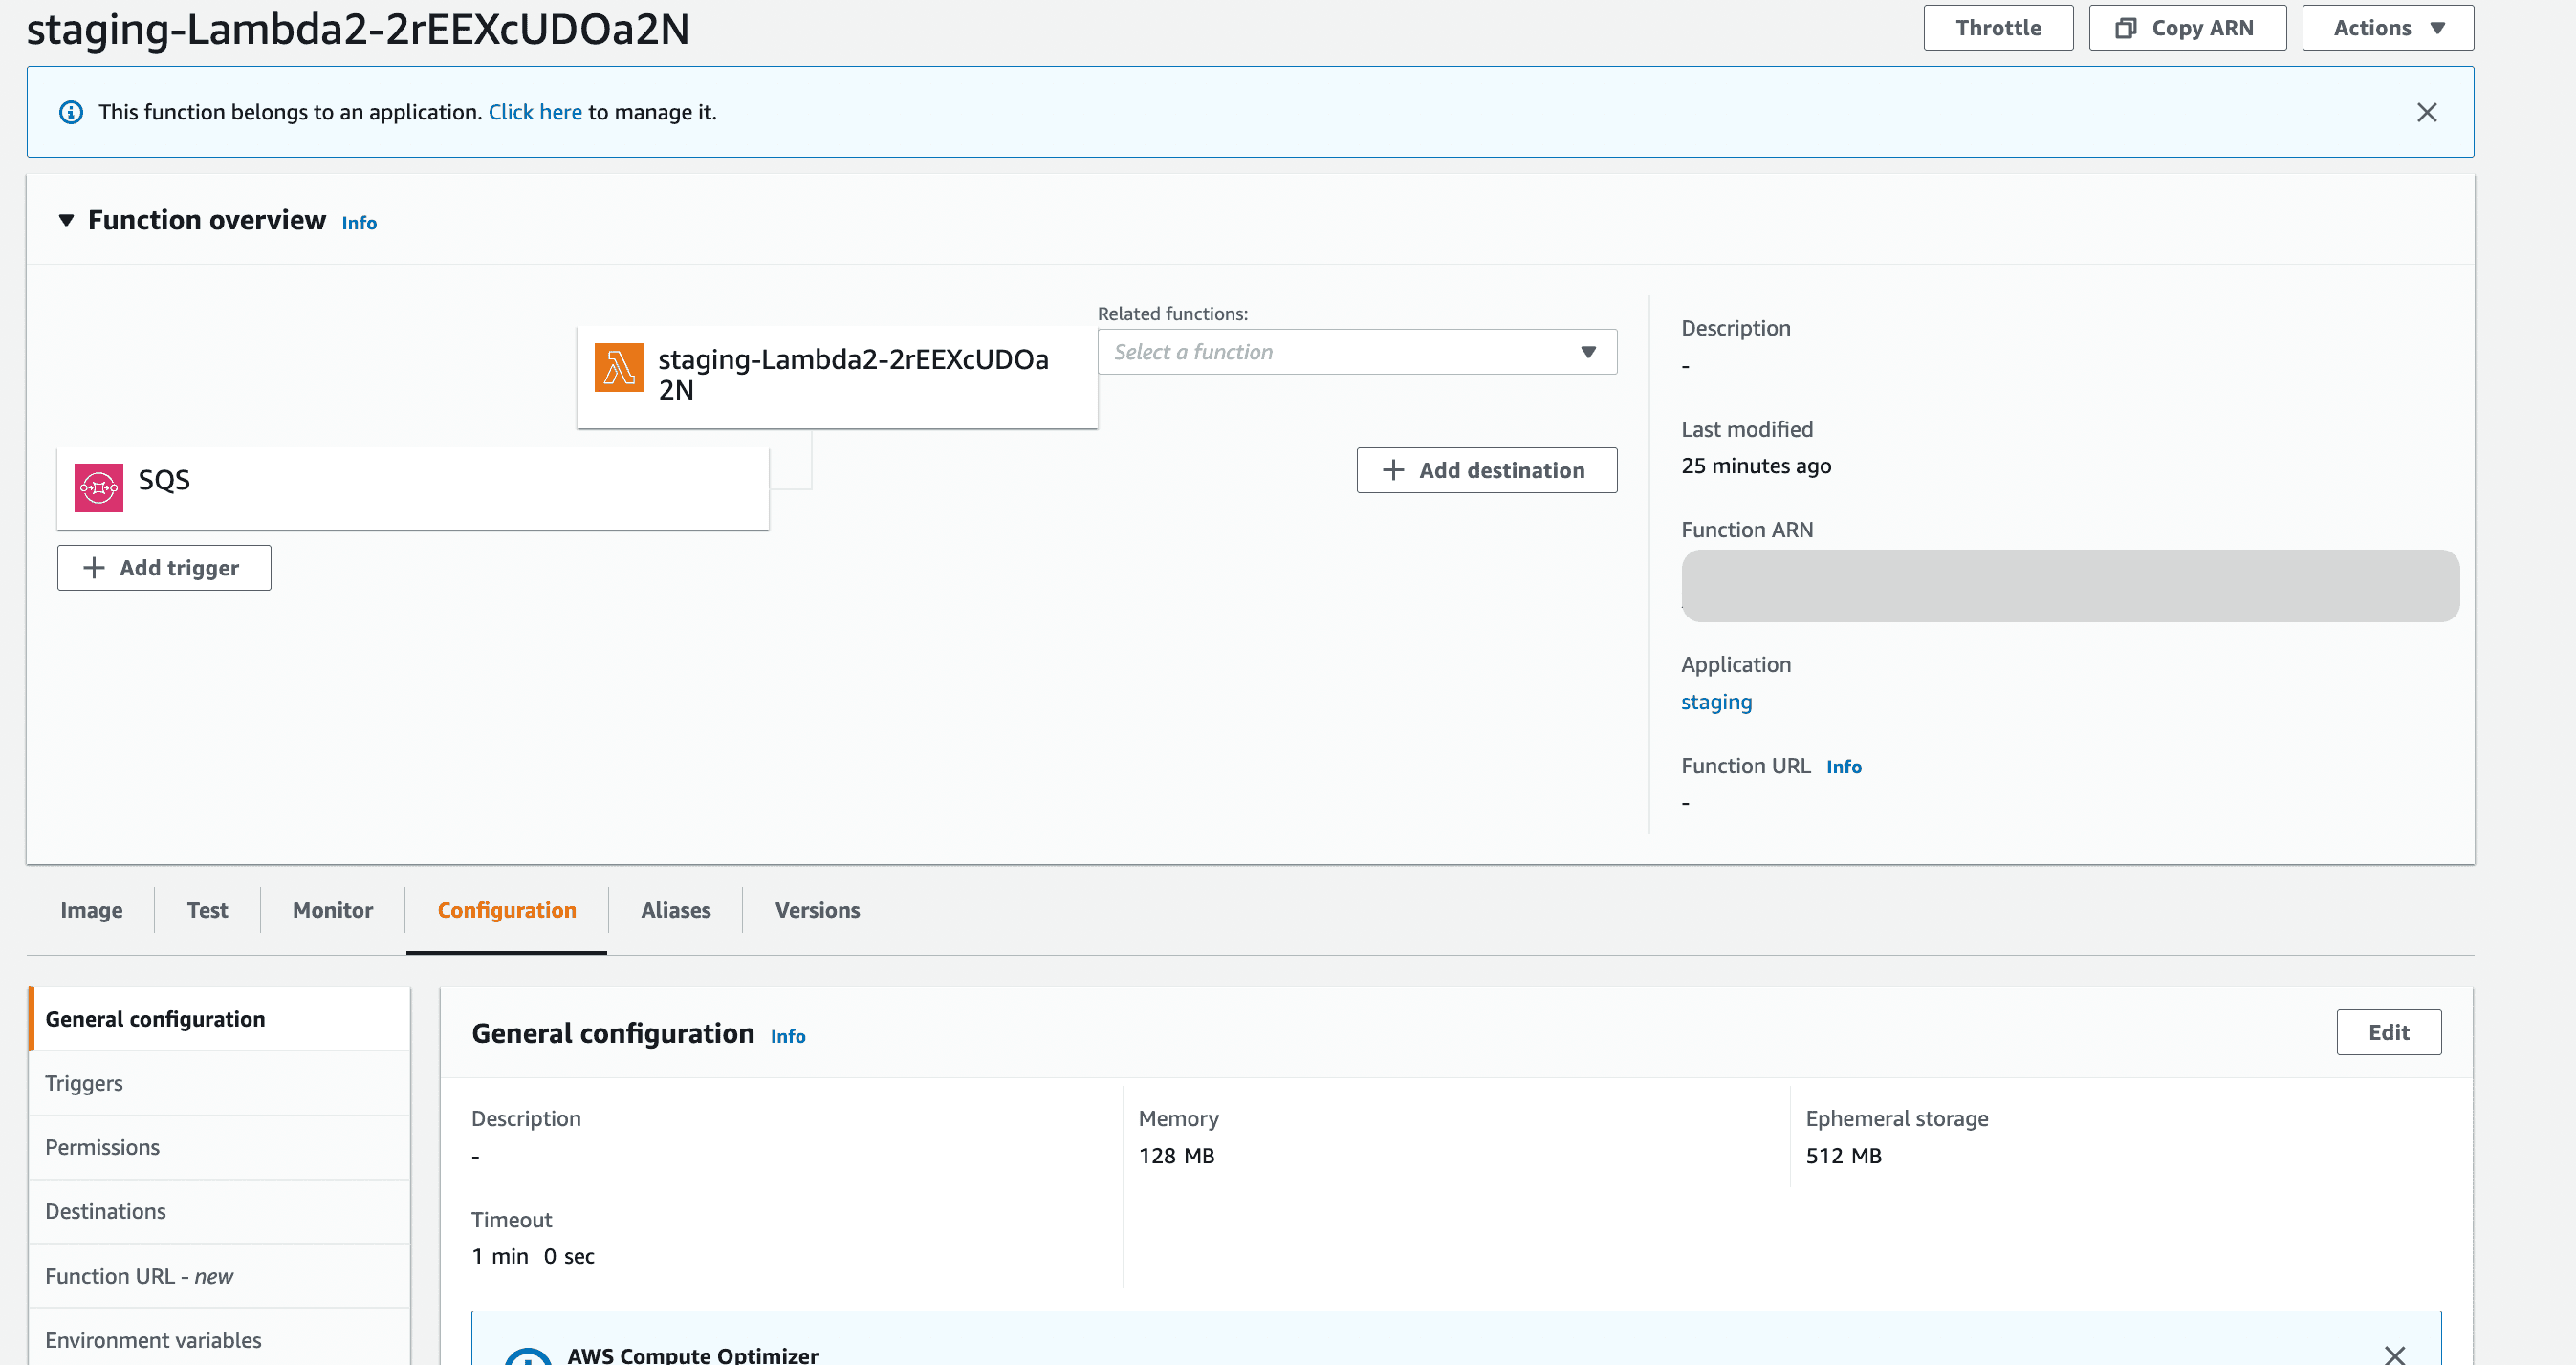
Lambda 2 looks like this
Moment of truth. Does it work?
Let’s try to invoke lambda 1 using api gateway and see if this works.
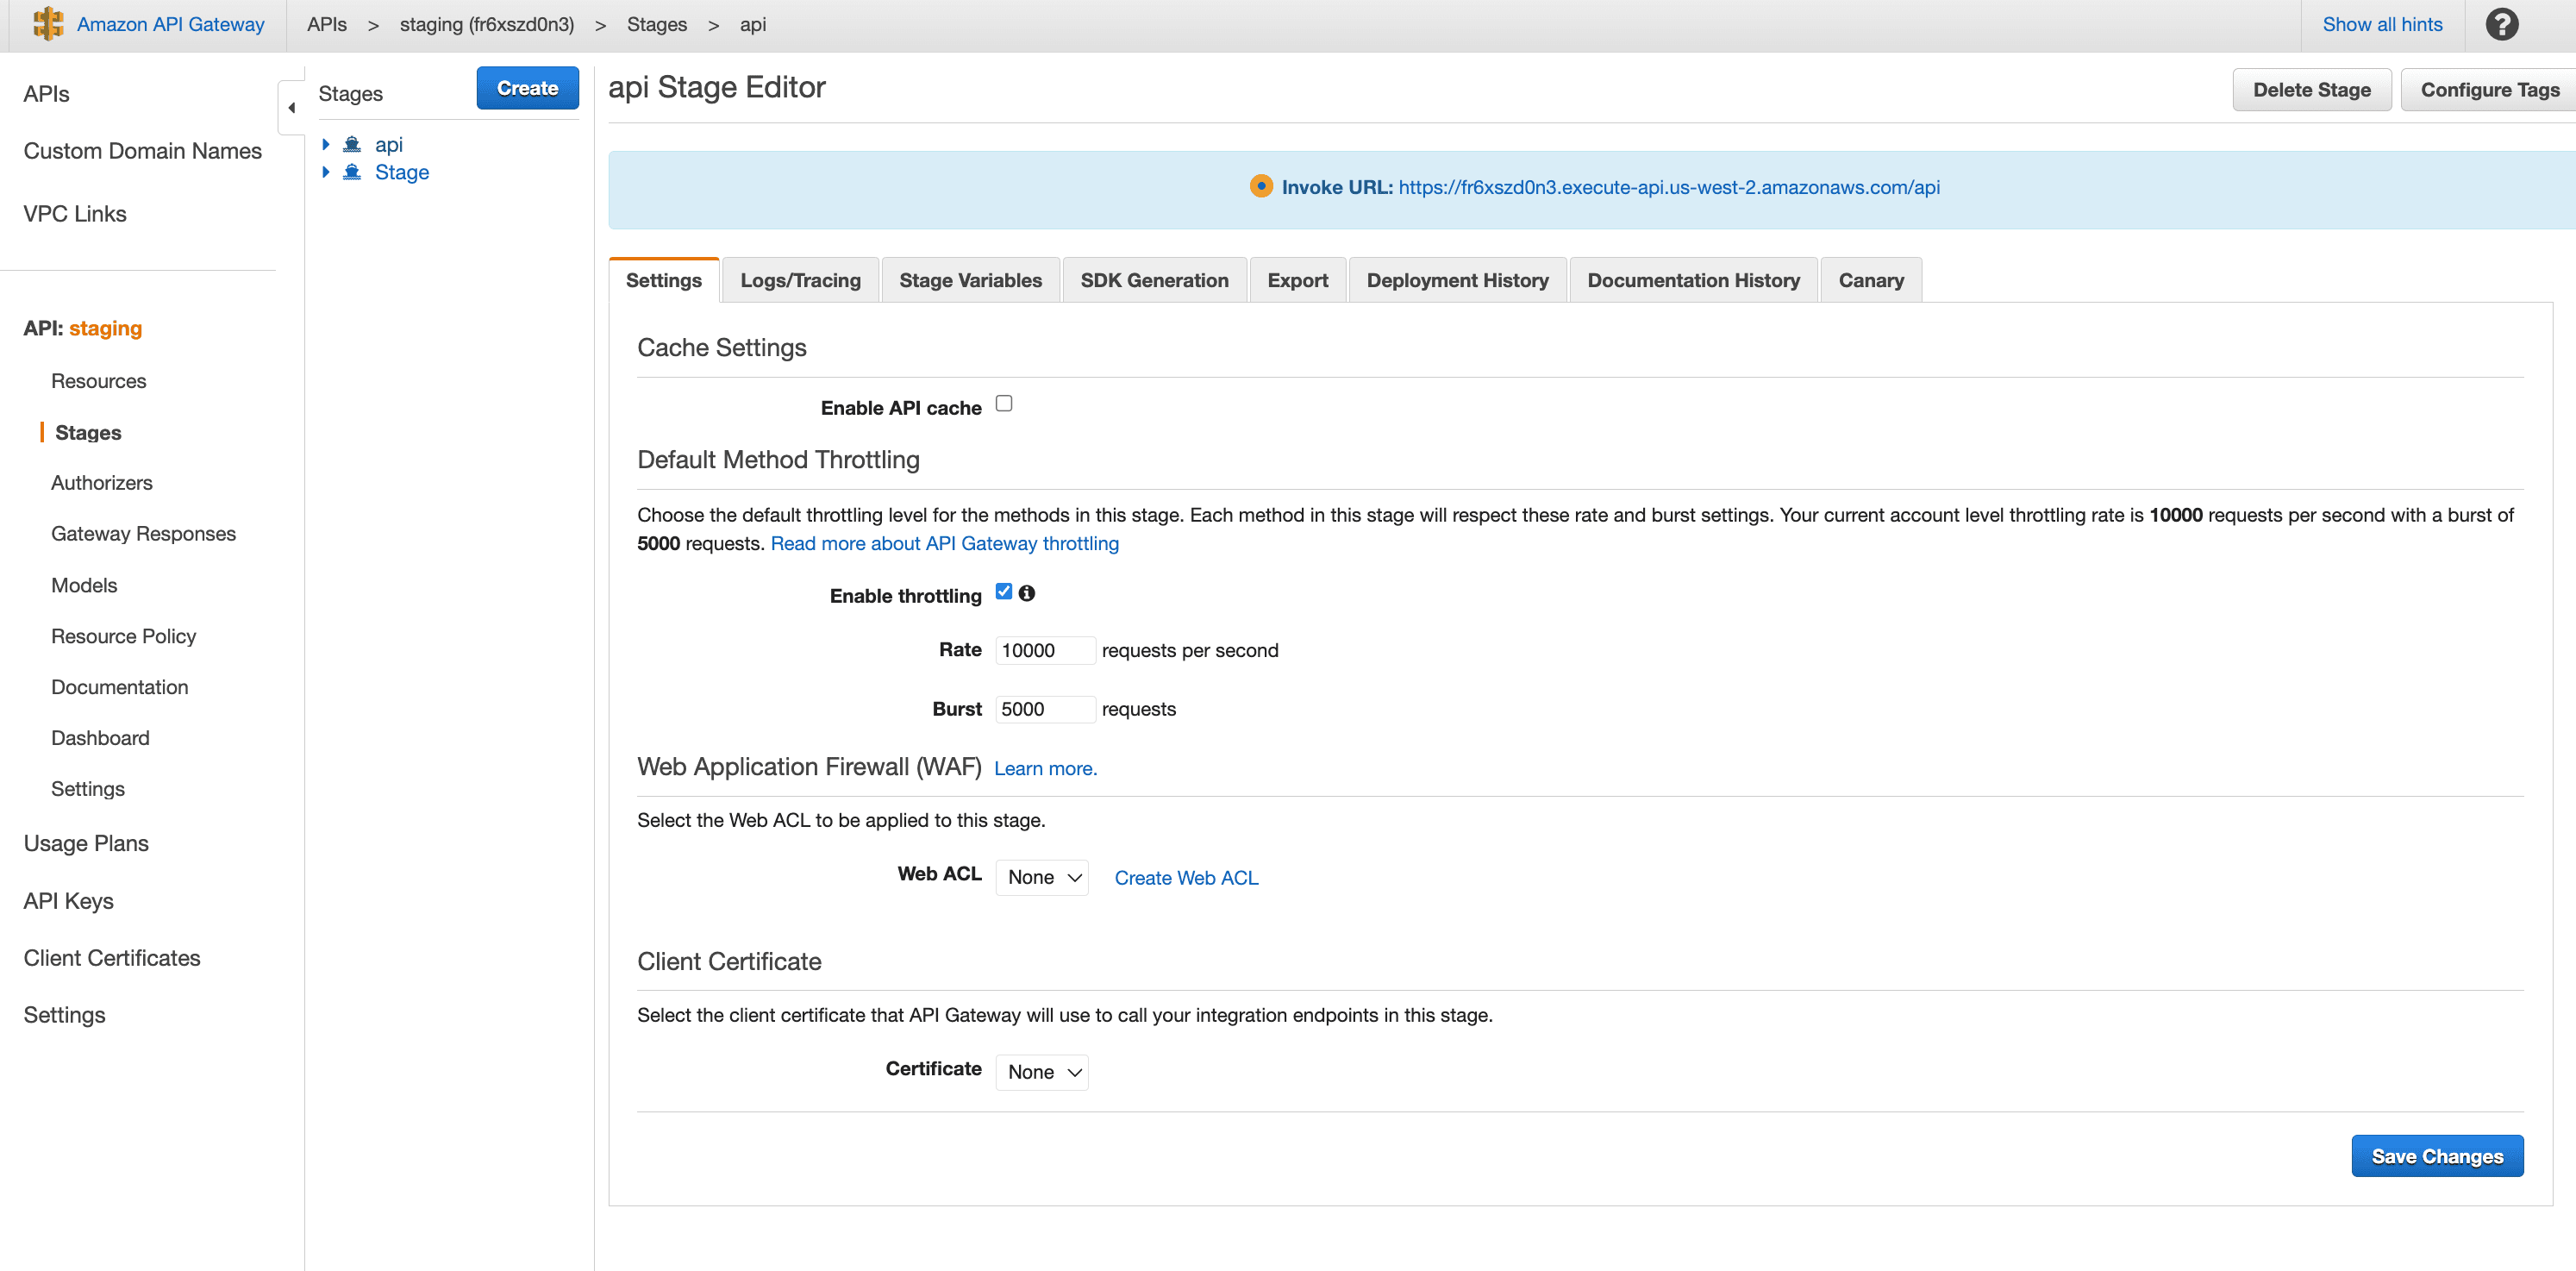
Get the api endpoint from API gateway
Let's invoke lambda1 using postman
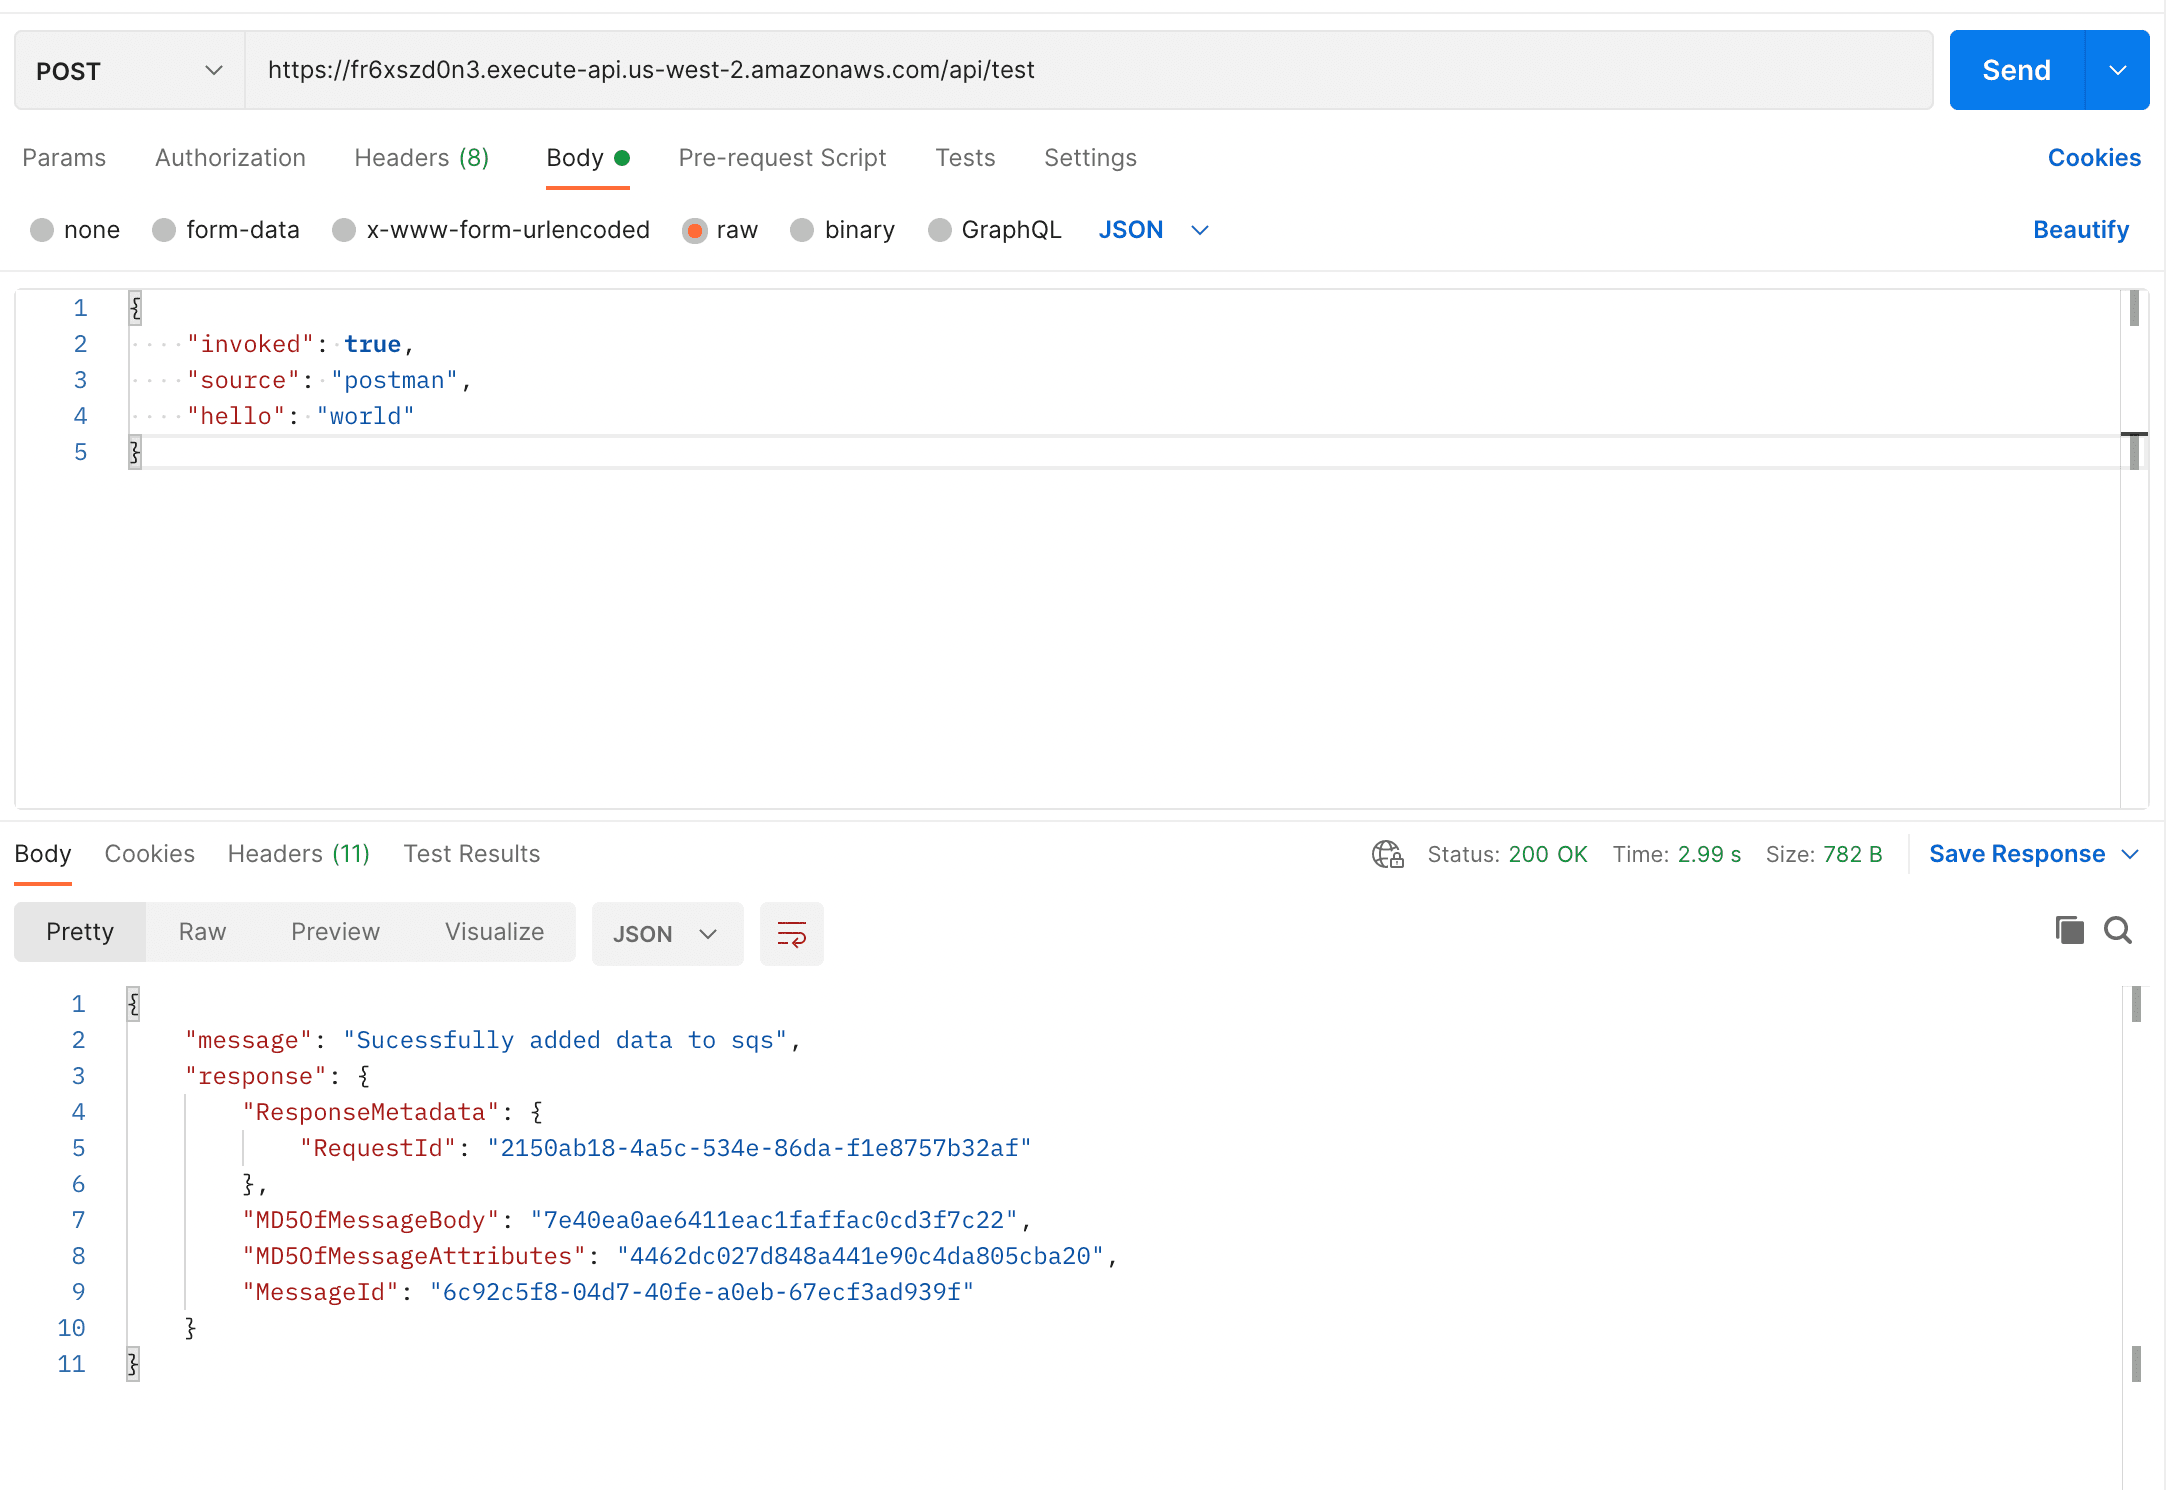
Success! Lambda1 has successfully enqueued our request body.
Let’s check if Lambda2 received the data
The logs are in AWS Cloudwatch and you can find it under the monitor tab of your lambda.
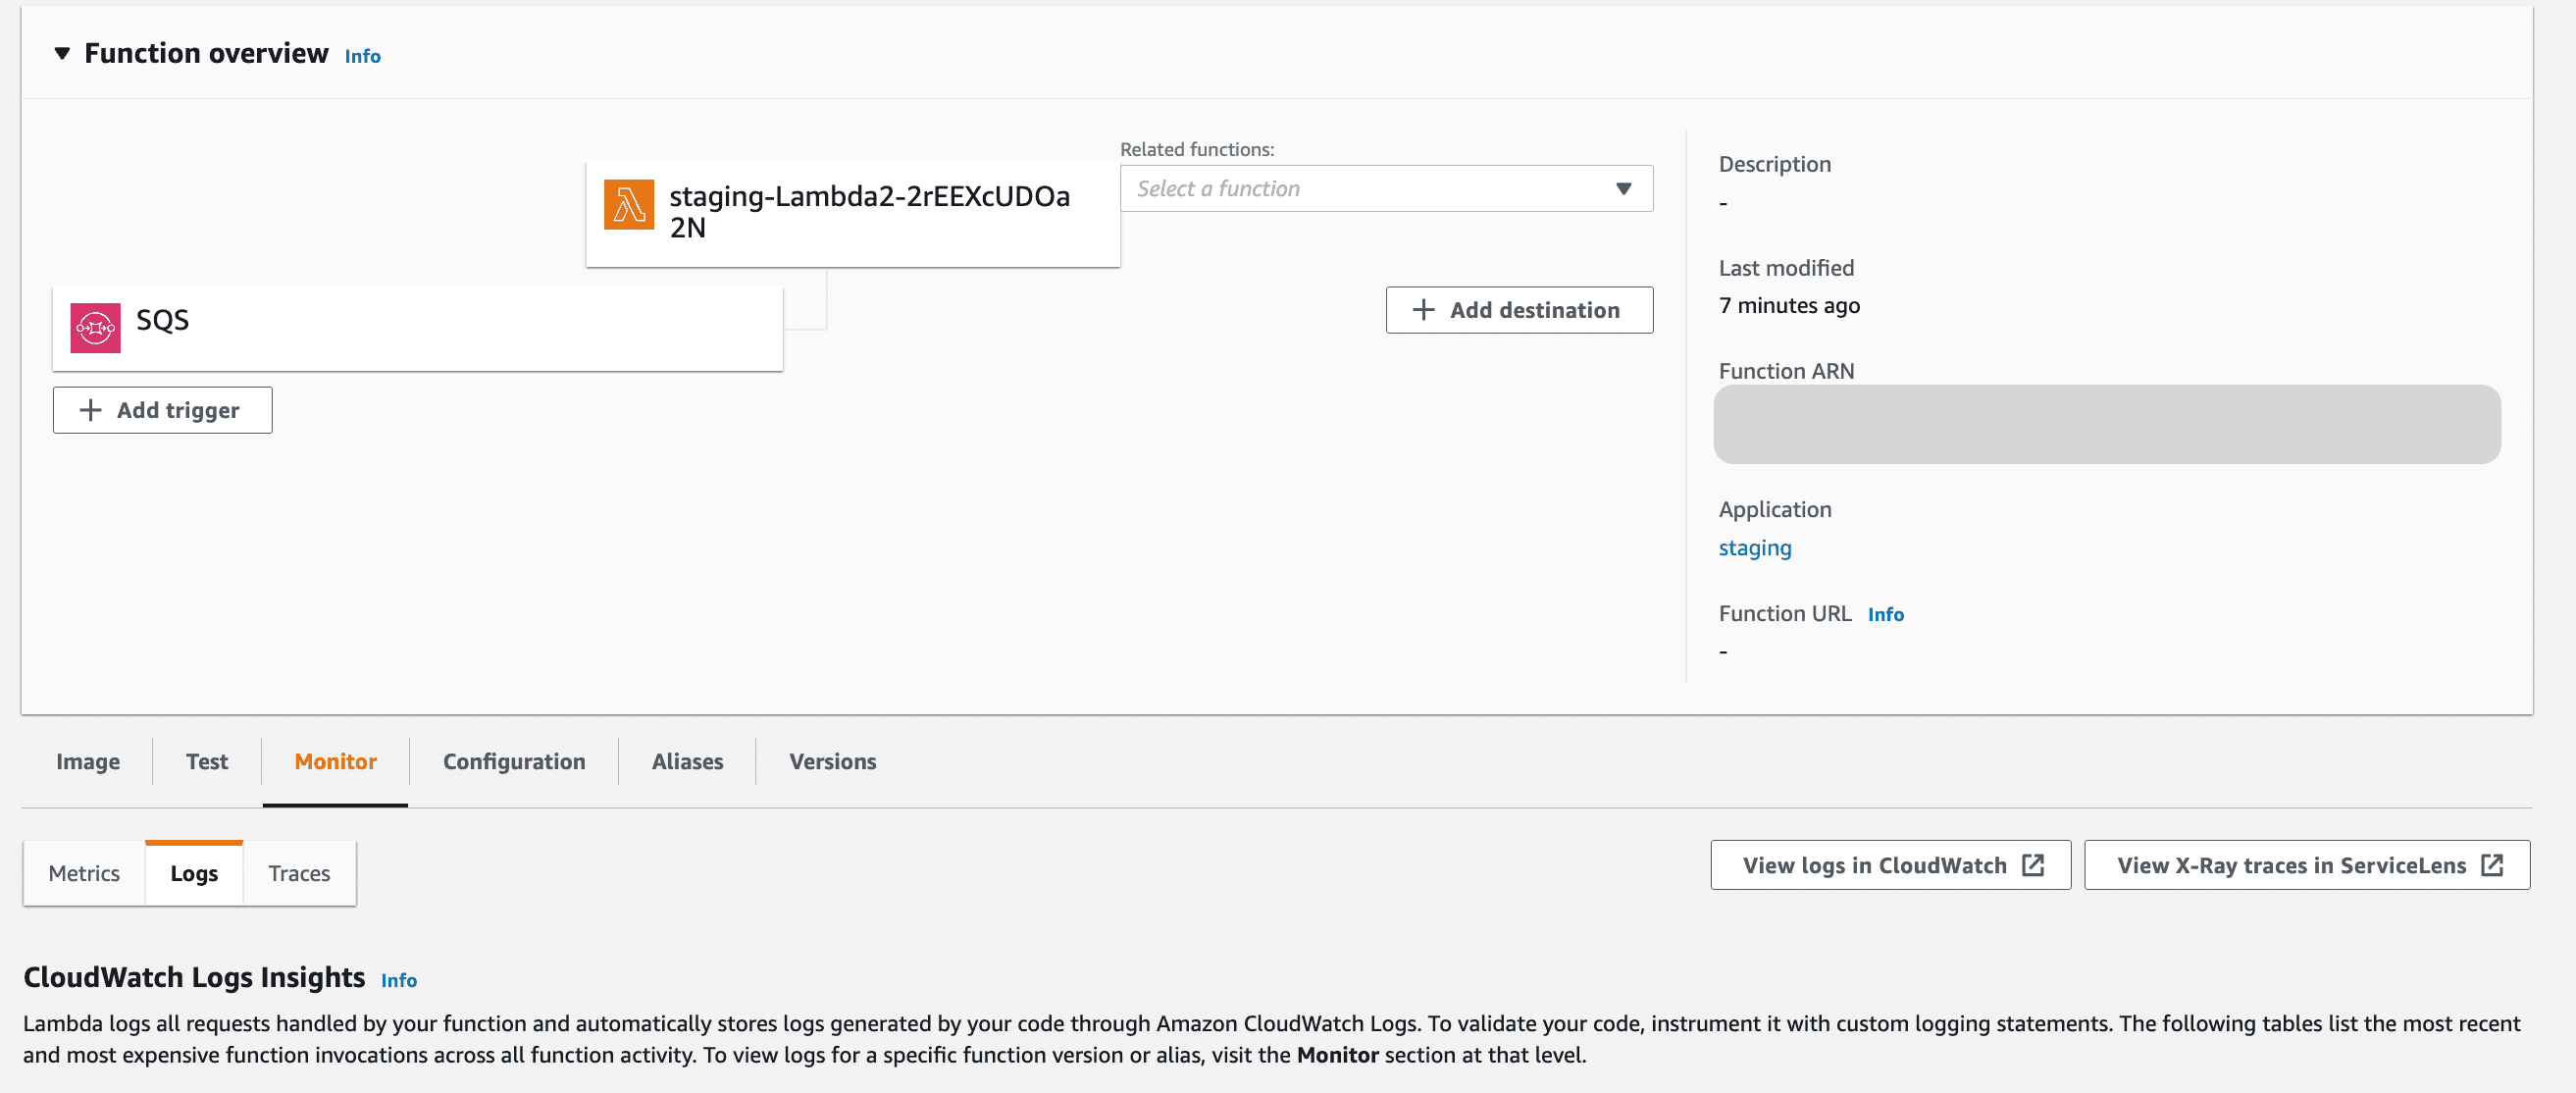
And Success, lambda 2 got invoked by SQS

Now staging is deployed and working. Let's deploy to production
Production
We can follow the same steps we followed while deploying to staging.
sam build
sam deploy --guided
P.S. Whenever you are deploying to a new environment we have to run sam deploy --guided. This creates the configurations for the new environment and the ECR container registries and s3 buckets for our Lambdas for that environment
sam deploy --guided

Configuring SAM deploy
======================

	Looking for config file [samconfig.toml] :  Found # since this file was already created when we deployed to staging
	Reading default arguments  :  Success

	Setting default arguments for 'sam deploy'
	=========================================
	Stack Name [sam-app]: **production**
	AWS Region [us-east-2]: **us-west-2**
	#Shows you resources changes to be deployed and require a 'Y' to initiate deploy
	Confirm changes before deploy [y/N]: **y**
	#SAM needs permission to be able to create roles to connect to the resources in your template
	Allow SAM CLI IAM role creation [Y/n]: **y**
	#Preserves the state of previously provisioned resources when an operation fails
	Disable rollback [y/N]: **n**
	Lambda1 may not have authorization defined, Is this okay? [y/N]: **y**
	Save arguments to configuration file [Y/n]: **y**
	SAM configuration file [samconfig.toml]:
	SAM configuration environment [default]: **production**

	Looking for resources needed for deployment:
	 Managed S3 bucket: aws-sam-cli-managed-default-samclisourcebucket-kd0tv9v6wm6s
	 A different default S3 bucket can be set in samconfig.toml
	 Image repositories: Not found.
	 #Managed repositories will be deleted when their functions are removed from the template and deployed
	 Create managed ECR repositories for all functions? [Y/n]: **y
.
.
.
.**
Previewing CloudFormation changeset before deployment
======================================================
Deploy this changeset? [y/N]: **y**
After successful deployment, our samconfig.toml file will look like something like this
version = 0.1
[staging]
[staging.deploy]
[staging.deploy.parameters]
stack_name = "staging"
s3_bucket = "aws-sam-cli-managed-default-samclisourcebucket-kd0tv9v6wm6s"
s3_prefix = "staging"
region = "us-west-2"
confirm_changeset = true
capabilities = "CAPABILITY_IAM"
image_repositories = ["Lambda1=123.dkr.ecr.us-west-2.amazonaws.com/staging830f78e0/lambda16ea82c0crepo", "Lambda2=123.dkr.ecr.us-west-2.amazonaws.com/staging830f78e0/lambda2bc5146a5repo"]

[production]
[production.deploy]
[production.deploy.parameters]
stack_name = "production"
s3_bucket = "aws-sam-cli-managed-default-samclisourcebucket-kd0tv9v6wm6s"
s3_prefix = "production"
region = "us-west-2"
confirm_changeset = true
capabilities = "CAPABILITY_IAM"
image_repositories = ["Lambda1=123.dkr.ecr.us-west-2.amazonaws.com/productionfd89784e/lambda16ea82c0crepo", "Lambda2=123.dkr.ecr.us-west-2.amazonaws.com/productionfd89784e/lambda2bc5146a5repo"]
These configuration are generated from the inputs we gave during sam deploy —-guided.
For future deployments to production we can run
sam build
sam deploy --config-env production
When doing a guided deployment, if you don’t specify an environment, sam creates the configurations under default environment. So if you have a default environment, then you can simply do sam deploy and your resources will get deployed to default environment.
Our deployments are successful, now if we go to AWS and to our respective resources, we will be able to see our Lambdas, Api Gateways and SQS.
Cloud formation

Lambda fundtions

SQS

Api Gateway

Your app directory looks something like this now
sam-app
├── .aws-sam
│   ├── build
│   │   └── template.yaml
│   └── build.toml
├── .gitignore
├── README.md
├── events
│   └── event.json
├── lambda-1
│   ├── .npmignore
│   ├── Dockerfile
│   ├── app.js
│   ├── package.json
│   ├── tests
│   │   └── unit
│   │       └── test-handler.js
│   └── utils
│       └── sqs.js
├── lambda-2
│   ├── .npmignore
│   ├── Dockerfile
│   ├── app.js
│   ├── package.json
│   └── tests
│       └── unit
│           └── test-handler.js
├── samconfig.toml
└── template.yaml

10 directories, 18 files
Just like that we have created a distributed serverless app using AWS managed resources and deployed it to 2 environments using AWS-SAM.
Bonus Tip
In most cases, our staging resource configuration and production resource configuration might be different or we might want it to be separate for some reason.
In that case, we can use 2 different template.yaml files to do this.
We can create template-<env>.yaml files.
eg: template-staging.yaml for staging and template-production.yaml for production
#For staging
sam build -t template-staging.yaml
# first deployment
sam deploy --guided # set environment to staging
# subsequent deployments
sam deploy --config-env staging
#For production
sam build -t template-production.yaml
# first deployment
sam deploy --guided # set environment to production
# subsequent deployments
sam deploy --config-env production
Your app directory will look something like this
sam-app
├── .aws-sam
│   ├── build
│   │   └── template.yaml
│   └── build.toml
├── .gitignore
├── README.md
├── events
│   └── event.json
├── lambda-1
│   ├── .npmignore
│   ├── Dockerfile
│   ├── app.js
│   ├── package.json
│   ├── tests
│   │   └── unit
│   │       └── test-handler.js
│   └── utils
│       └── sqs.js
├── lambda-2
│   ├── .npmignore
│   ├── Dockerfile
│   ├── app.js
│   ├── package.json
│   └── tests
│       └── unit
│           └── test-handler.js
├── samconfig.toml
├── template-production.yaml
└── template-staging.yaml

10 directories, 19 files
Clean up
If we have to delete our stack we can do it using the following commands
sam delete --[options]
If you have multiple stacks running in multiple regions, then the correct set of options should be provided to identify the exact stack to be deleted. AWS has great documentation for this.
In our case, to delete staging from us-west-2
sam delete --stack-name staging --region us-west-2
This will delete our staging environment.
Conclusion
Never again should configurations be a blocker for development. A golden rule that we follow is to look for managed resources that help solve a problem. This helps us build and ship applications with ease and focus on building the application rather than configuration. I will leave the github-repo for this app, which can be used as a boilerplate to get started.